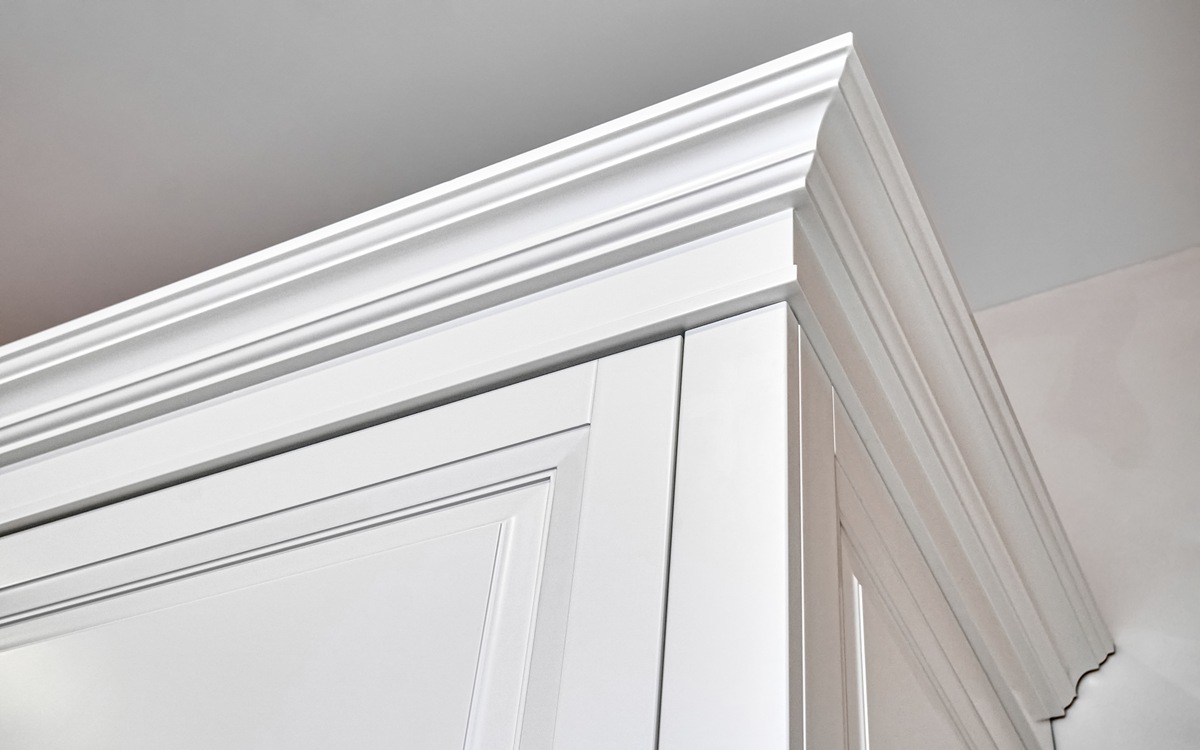
Ever watched interior house painters finish a room and wondered how they get those razor-sharp lines where the trim meets the wall? You’re not alone. If you’ve ever tried painting trim yourself and ended up with sloppy edges, paint bleeding onto your walls, or tape that pulled off fresh paint, you know how frustrating it can be. The good news? These trim painting tips for beginners will show you exactly how to get professional-looking results without the headaches.
Painting trim looks simple enough. But when you actually pick up a brush and try it, things get messy fast. The difference between a DIY job that looks amateur and one that looks like a pro did it often comes down to technique, tools, and a little patience.
Key Takeaways:
- Clean and prep your trim before painting to help paint stick and look smooth.
- Use the right brush—a high-quality angled brush makes a huge difference.
- Learn the “cutting in” technique to paint clean lines without relying on tape.
- Apply thin coats instead of thick ones to prevent drips and brush marks.
- Take your time and let each coat dry fully before adding another.
Why Trim Painting Feels So Hard
Here’s the thing about painting trim: it requires a steady hand and a different approach than rolling paint on walls. Trim is narrow. It has edges, corners, and angles. And it sits right next to surfaces you don’t want to mess up.
Most beginners make the same mistakes. They load too much paint on the brush. They skip the prep work. They rush through the job. And they end up with wobbly lines, drips running down the baseboard, and paint smeared on walls they just finished.
But none of this means you can’t do it yourself. It just means you need the right approach.
Start With a Clean Surface
Paint doesn’t stick well to dirt, dust, or grease. Before you open a single can of paint, wipe down all your trim with a damp cloth. For baseboards, get down on your hands and knees and really look at them. You’ll probably see dust buildup, scuff marks, and maybe even sticky residue.
If your trim has glossy old paint on it, lightly sand it with fine-grit sandpaper (around 120-150 grit). This scuffs up the surface so the new paint has something to grab onto. Wipe away the dust with a tack cloth when you’re done.
Got any holes, dents, or cracks? Fill them with wood filler, let it dry, then sand smooth. This step takes time, but it makes a visible difference in the final result.
Choose the Right Tools
The tools you use matter more than you might think. Here’s what you’ll need:
- A quality angled brush: This is non-negotiable. A 2-inch or 2.5-inch angled sash brush gives you control and helps you paint clean lines. Cheap brushes shed bristles and leave streaks. Spend a few extra dollars on a good one—it’s worth it.
- The right paint: For trim, you want a semi-gloss or high-gloss finish. These sheens are durable, easy to clean, and highlight the trim’s details. Many painters prefer acrylic-latex paint for interior trim because it dries fast and cleans up with water.
- Painter’s tape (maybe): We’ll talk more about this below, but tape isn’t always necessary. Some painters swear by it. Others skip it entirely and rely on their cutting-in skills.
- A small bucket or paint tray: Don’t dip your brush directly into the can. Pour some paint into a smaller container so you can control how much paint gets on your brush.
- Drop cloths: Protect your floors. Paint drips happen, even to pros.
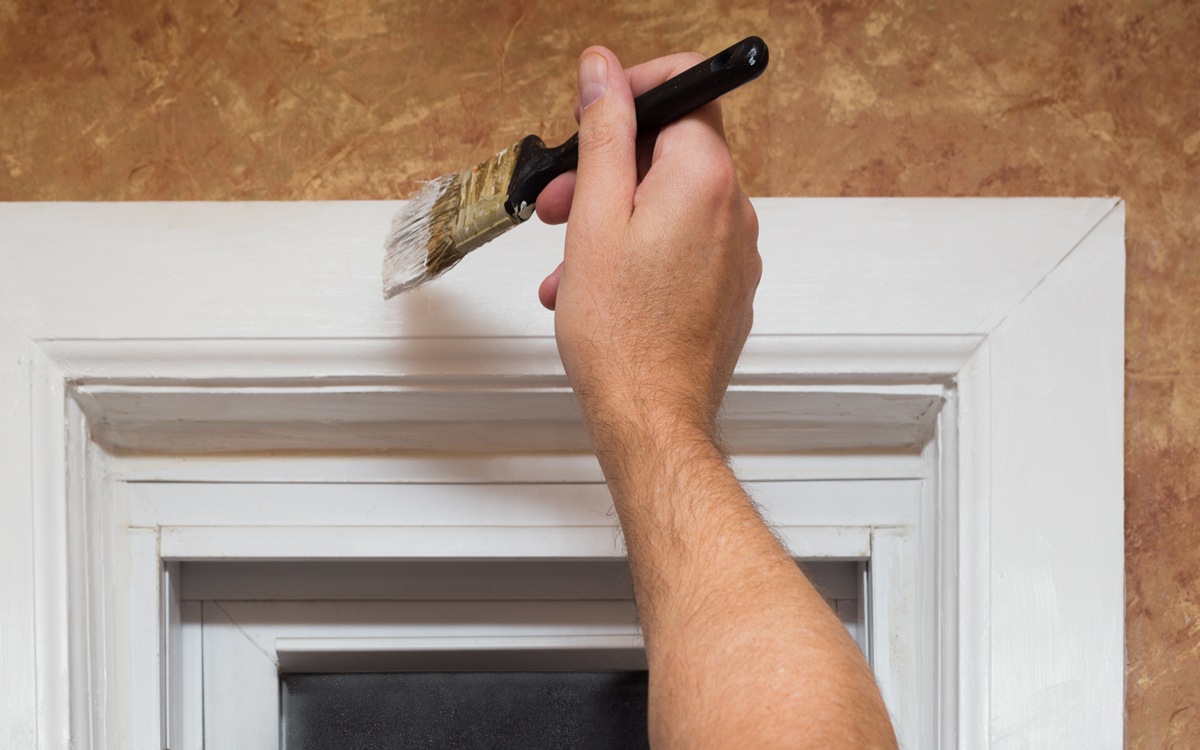
The Cutting-In Technique
Here’s what separates beginners from people who paint like pros: cutting in.
Cutting in means using your brush to paint a clean line where two surfaces meet—like where your trim meets the wall. When done right, you don’t need tape at all.
Here’s how to do it:
- Load your brush properly. Dip only about one-third of the bristles into the paint. Then tap (don’t wipe) the brush against the side of your container to remove excess paint. You want enough paint to work with, but not so much that it drips.
- Hold the brush correctly. Grip it like a pencil, near the base of the handle. This gives you more control than holding it like a hammer.
- Start slightly away from the edge. Don’t start your brush stroke right at the line where the trim meets the wall. Instead, start about a quarter inch away from the edge, then slowly bring the brush toward the line as you drag it along.
- Use the angled edge. The tip of your angled brush should do the work at the edge. Let the bristles fan out slightly as you apply gentle pressure.
- Pull in long, smooth strokes. Short, choppy strokes leave marks. Aim for smooth, even passes. Reload your brush when it starts to drag.
This technique takes practice. Your first few feet might look rough. But by the time you finish a room, you’ll be surprised how much better you’ve gotten.

Should You Use Painter’s Tape?
Painter’s tape can help, but it’s not magic. And if you use it wrong, it can actually cause problems.
Tape works best when:
- You’re brand new to painting and need training wheels.
- You’re painting trim that’s next to a freshly painted wall and can’t risk getting trim paint on it.
- You’re working on detailed trim with lots of edges and corners.
But tape has downsides:
- Paint can bleed under the edge if you don’t press it down firmly.
- Removing tape can peel off fresh paint if you wait too long.
- It adds time to your prep work.
- It costs money on every project.
If you do use tape, press down the edge firmly with a putty knife or plastic card. This seals the edge and stops paint from sneaking underneath. Remove the tape while the paint is still slightly tacky—not fully dry and not still wet. Peel it back slowly at a 45-degree angle.
Many experienced painters skip tape entirely and rely on their cutting-in skills. It’s faster once you’ve practiced, and the results look just as good.
Apply Thin Coats
One of the biggest beginner mistakes is putting on too much paint at once. Thick coats lead to drips, sags, and visible brush strokes. They also take forever to dry.
Thin coats are better. They dry faster, level out more smoothly, and build up to a stronger finish over multiple layers.
Plan on applying at least two coats of paint to your trim. Some colors, especially whites and light shades, may need three coats for full coverage.
Let each coat dry completely before applying the next. Check the paint can for drying times. Rushing this step will ruin your work.
Work in the Right Order
The order you paint a room matters. Most pros follow this sequence:
- Ceilings
- Walls
- Trim (baseboards, door frames, window frames, crown molding)
Why save trim for last? Because it’s easier to cut in trim against a dry, finished wall than to cut in walls against freshly painted trim. If you get a little wall paint on the trim, you can cover it when you paint the trim later.
When painting trim itself, work from top to bottom. Start with crown molding, then do door and window frames, and finish with baseboards. This way, any drips fall onto surfaces you haven’t painted yet.
Take Your Time
Painting trim isn’t a race. Rushing leads to mistakes—and mistakes mean more work fixing them.
Set aside enough time to do the job right. A single room’s worth of trim can take several hours when you factor in prep, multiple coats, and drying time.
Take breaks when your hand gets tired. A shaky hand makes shaky lines. Step back often to check your work from different angles. You’ll catch drips and missed spots before they dry.
What If You Make a Mistake?
Mistakes happen. Here’s how to fix them:
- Wet paint on the wall: If you get trim paint on the wall while it’s still wet, wipe it off gently with a damp cloth right away. Don’t smear it—dab and lift.
- Dried paint on the wall: Wait until your trim paint is fully cured (usually 24-48 hours), then carefully touch up the wall with wall paint using a small brush.
- Drips on the trim: If you catch a drip while the paint is still wet, brush it out immediately. If it’s already dried, let everything cure, then lightly sand the drip and repaint that section.
- Brush marks: Thin coats and quality brushes prevent most brush marks. If you still see them after the paint dries, lightly sand and apply another thin coat.
When to Call a Professional
DIY trim painting can save you money. But it’s also time-consuming and takes patience. If your trim has lots of detail, damage that needs repair, or you’ve got multiple rooms to tackle, hiring professionals might make more sense.
Professional painters have the experience, tools, and speed to get the job done right. They see the problems you might miss. And they handle all the prep, painting, and cleanup so you don’t have to.
Ready for a Flawless Finish?
Painting trim yourself is doable—especially now that you know the techniques that make a real difference. Take your time, prep your surfaces, use quality tools, and practice your cutting-in skills. You’ll be proud of the results.
But if you’d rather skip the learning curve and get perfect trim the first time, the team at EAG Painting & Decoration Inc. is here to help. We paint trim, walls, and entire rooms with the precision and care your home deserves.
Call us at 510-851-8860 to get a free estimate. Let’s make your home look the way you’ve always wanted.


